
Creating and submitting a report
- Creating a report
- Entering report data
- Monitoring your progress
- Renaming a report
- Deleting a report
- Checking for errors
- Attaching files
- Submitting a report
Terminology
- Commonly used terms
In PV-Express II there are two types of users: Guest users and Registered users.
Guest users are permitted to submit a report without logging in, however they will see a limited set of features. For example, guest users cannot store any reports on their device ready for completing later on.
Registered users must login to the application in order to submit a report. Once logged in, they will remain logged in for a given period of time as set by the system administrator. This may range from a few minutes to several days. Registered users have a full range of features available to them, including the ability to submit follow-up reports.
Passwords need to be complicated enough so that they cannot be easily guessed. PV-Express II requires that all passwords are at least 7 characters long and must contain at least two of the following:
It is recommended that common words, names and number sequences are avoided and that the password is never written down.
Passwords can be changed at any time by clicking the 'Change password' button on the Settings page.
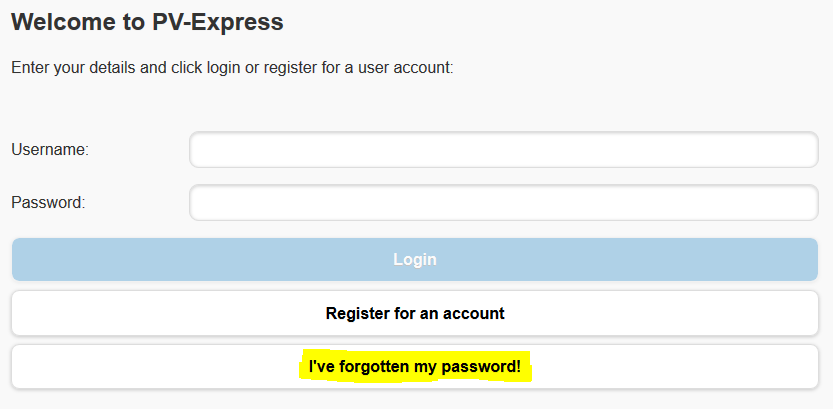
If you forget your password then you will need to click the 'I've forgotten my password' button on the 'Start' screen. You will then be asked to provide your email address, and an email will be sent containing instructions on how to reset your password.
When you register for an account or login for the first time you will be asked to choose a security question and answer. These will then be used each time you change or reset your password as an additional security feature. Your chosen security question or answer can be changed at any time by clicking the 'Change security question or answer' button on the 'Settings' page.
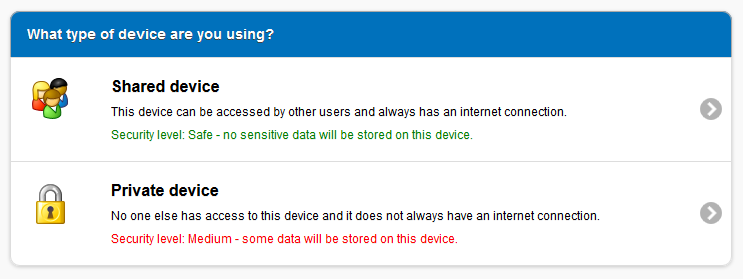
Registered users are able to select whether the device they are using is 'shared' or 'private'. PV-Express II then uses this information to determine the level of security to apply and whether or not to store information on the device itself.
A shared device is any desktop, laptop, tablet or smartphone that may be used by someone other than yourself. If this is the case then another person could potentially access the data you enter into the application, creating a possible security risk. As a result, reports that are created on shared devices cannot be saved onto the device itself. Any reports you create must be created and submitted in the same session.
When using PV-Express II on a shared device an Internet connection is required to create and submit reports.
A private device is any desktop, laptop, tablet or smartphone that only you have access to. When using PV-Express II on a private device, a number of extra features are available including the ability to save data offline. On a private device, reports do not need to be completed and submitted in the same session. Reports can be started and saved on the device ready to access at a later date, however it is recommended that the number of incomplete reports are kept to a minimum.
Please note: If your web browser's offline cache is deleted then all report data will be erased. Please be aware of this if you should need to empty your browser cache for any reason.
The device selection page appears only for registered users who are using a particular device for the first time.
If you switch to a different device or choose to delete your browser cache, then the page above will be displayed again.
If you decide that your device type has been set wrongly or you wish to change it for some reason then this can be done using the 'Device type' dropdown on the settings page.

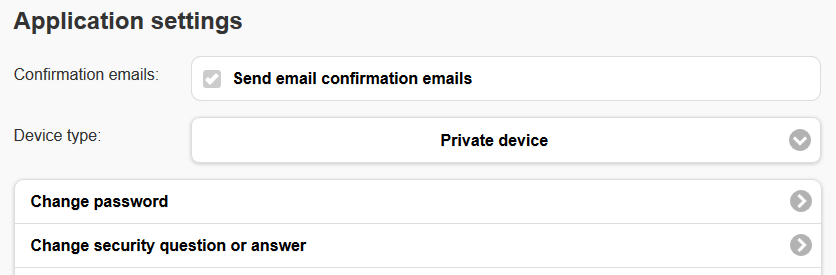
The Settings page allows you to configure the application and edit your user details. An Internet connection is required to access or change some of the settings.
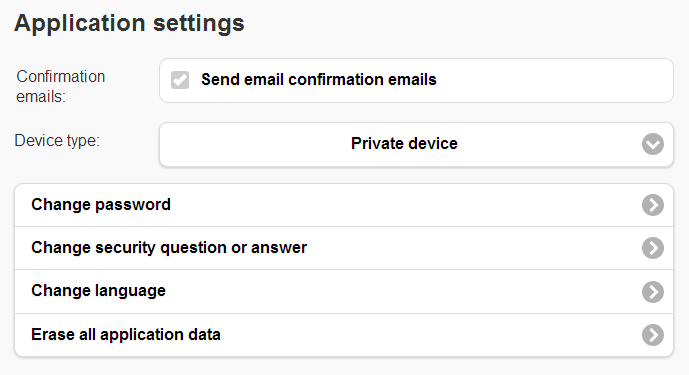
Each time you submit a case report, an email can be sent your registered email address containing the Report ID number and a summary of the information in the report. These can be switched on or off by checking the box.
The Device type can be set to either Shared or Private - see 'Device types: shared or private?' for more information.
Please note: If your device type is changed from Private to Shared then all application data will be erased.
Your user account password can be changed by clicking the 'Change password' button. You will need to supply your old password and the answer to your security question (If used).
The security question and answer are used in the event that you forget your password. You can change these by clicking the 'Change security question or answer' button.
The language of the application can be changed to one of the supported languages. Just click the 'Change language' button and select your chosen language from the list.
If you need to delete any data that you have stored in the application then you can click 'Erase all application data'. This will remove all PV-Express II data from the device and return you to the login screen.
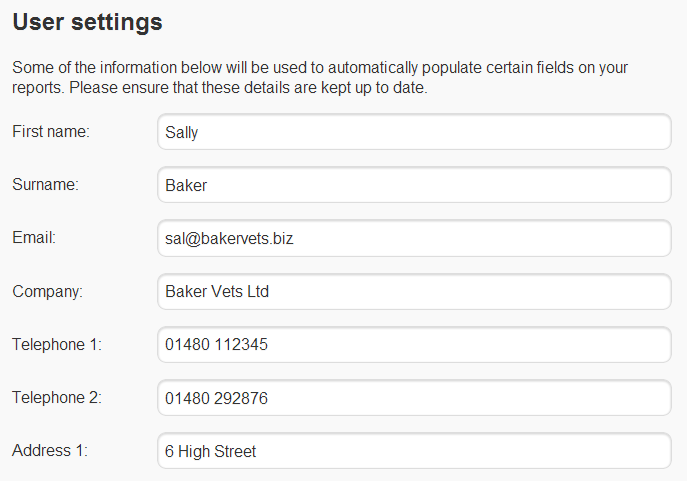
Your account details are used to identify yourself as a PV-Express II user and also to automatically populate certain sections of the reports that you submit.
If you need to make any changes then you can update the information on screen and choose 'Save and close'.
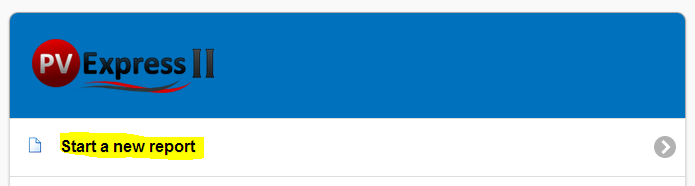
A new report can be started by clicking 'Start a new report' on the application homepage.
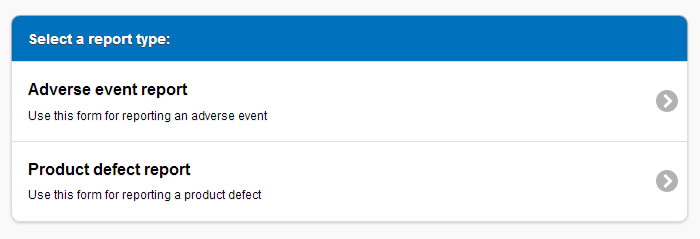
You will then be asked to choose a report type from the list that is displayed. Here you may see one report type or possibly several different ones.
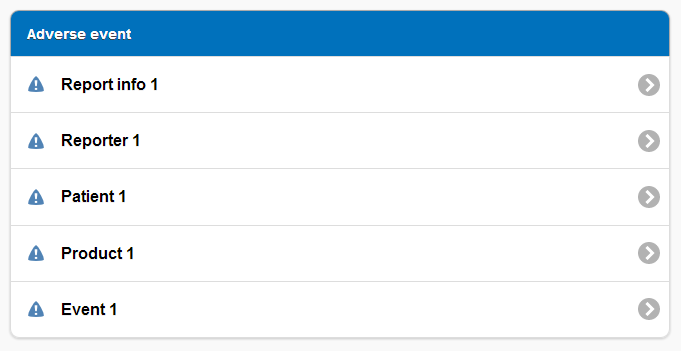
Once you have made your selection you will be taken to the report screen. Here you will see a number of different report sections, ready to be completed.
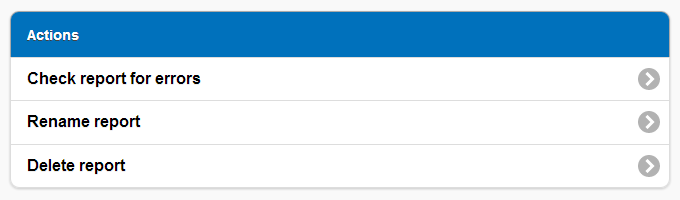
The 'Actions' section allows you to perform various actions on the report itself, such as checking for errors, renaming the report or deleting it.
When you are ready to submit your report you can click the submit button at the bottom of the screen.

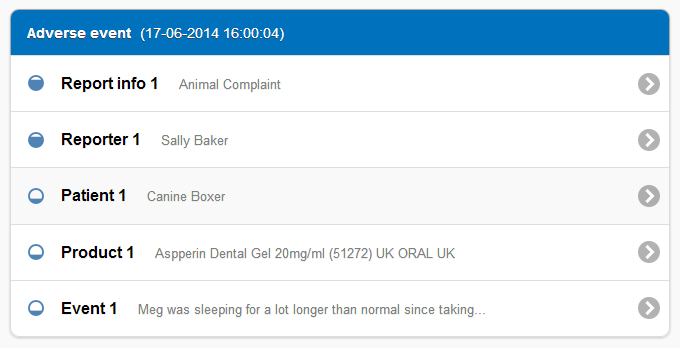
Each report is split into a number of different sections, so that it is easier to complete. These sections may vary depending on the type of report that you are using.
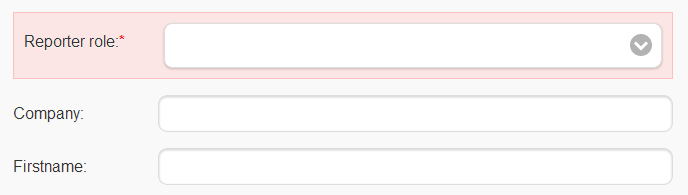
Click on a section and then a number of different fields will be displayed, ready for you to enter your data. Any that are marked with a red asterisk must be completed.
When you have completed a section, click the 'Save and close' button either at the top or the bottom of the screen. You can revisit a section at any time just by clicking on the relevant link on the report page.
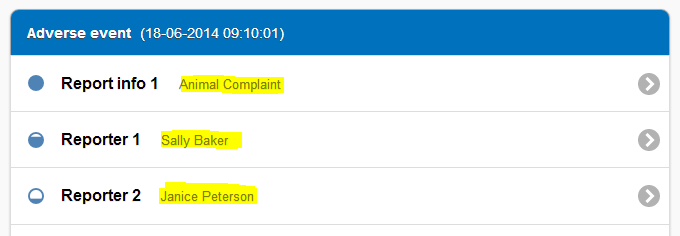
Some reports allow you to add new sections so that you can enter more than one product or more than one reporter for example. If this is possible then you will see one or more 'Add section' buttons on the report screen.

Clicking on one of these buttons will add a new section to your report, ready for you to add your data.
If you need to delete a section then visit the section itself and click the delete button at the bottom of the screen.

As you progress through your report a number of icons will appear to the left of each section name. These will help you to be aware of which sections need more data
A number of sections are likely to contain mandatory fields that must be completed. If any of these have been left blank then an alert icon will be displayed.

Once all mandatory fields have been completed within a section, the icons will update to show you how much of the section has been completed.
It is a good idea to keep an eye on these, as the more data you supply, the more useful your report will be.
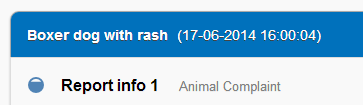
As your report builds up, each section will display some key information to help remind you which section has been used for which set of information.
It may be helpful to give your reports a name so that they are easier to keep track of. This can be done by clicking the 'Rename report' button in the 'Actions' section of the 'Report' page.
You will be asked to enter your new report name and then the new name will then appear towards the top of the 'Report' page.
If you wish to delete a report for any reason then click the 'Delete report' button in the 'Actions' section of the report screen.
You will be asked to confirm that you wish to delete the report before it is erased.
Certain fields have particular requirements for the way in which they are completed. This is so that your data can be captured as accurately as possible. For example, it is essential that a patient's weight also includes its corresponding unit. Similarly, the start date of an event must be before the end date of the event and so on.
When you submit your report, a number of different checks will be performed to ensure that each of these requirements have been satisfied. If any errors occur then you will be asked to fix these and then try again.
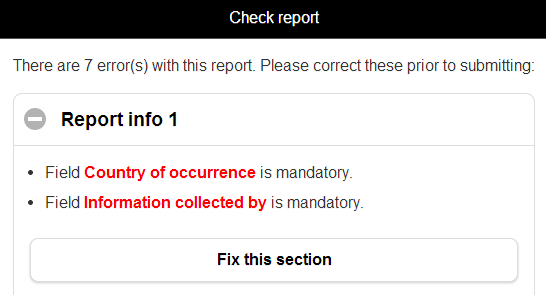
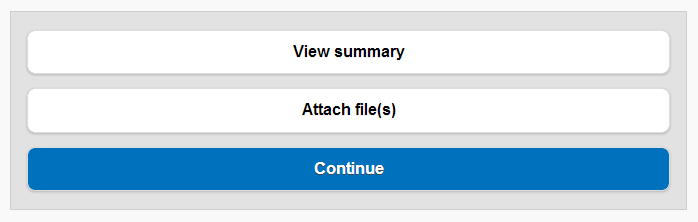
You can check your report for errors at any time by clicking the 'Check report for errors' button on the report screen.
This will then display any errors, split up into the sections on your report. To correct the errors you can click the 'Fix this section' button for the chosen section.
Occasionally there may be an error that is only identifiable after you have clicked the submit button, however if this occurs you will receive full details of anything that needs to be changed.
If you have any supporting information, such as a photograph of the reaction or a lab test document, then this could prove very useful to the organisation who receives your report. Documents can be added to an initial report as necessary.
Attachments can be added to a report after it has been submitted. Once the report data has been received, the confirmation screen will be displayed, giving you the details of your recent submission. Towards the bottom of this screen is an 'Attach file(s)' button.
If you'd like to add an attachment then click on the 'Attach file(s) button and then the 'Attach files' popup will be displayed. Here you can click on one of the 'Click to attach' buttons and browse for the file on your machine or device.
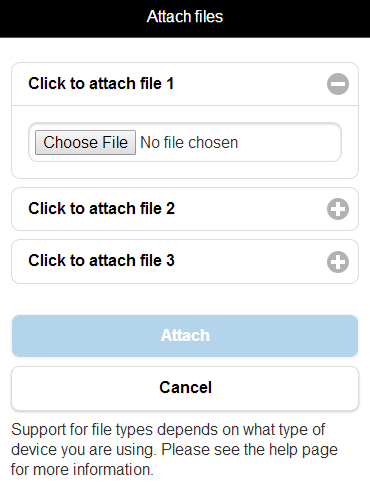
Certain devices, such as tablets and smartphones may allow you to access the device's camera so that you can immediately take a photo or video. Once you've selected up to three files you can click the 'Attach' button to finish.
In general, most common file formats can be attached. However, support will vary according to the type of device that you are using. For example, a desktop PC is likely to support more file types than an iPhone for example.
File size is limited to 5 MB for each file by default, however it may be that this setting has been overridden by your host organisation.
Once you are satisfied that your report is complete you can click the 'Submit Report' button at the bottom of the 'Report' screen.
After confirming that you wish to submit the report, a number of checks will take place to ensure that your report data does not contain any errors. If there are any problems then a message will be displayed asking you to review certain areas of your report.

Once any errors have been corrected you can try again to submit the report. If all of the validation checks are passed then the report will be sent into the PV-Express II database.
Once the submission is complete a confirmation screen will be displayed. This will include the report's name and 'Report ID' for your reference. Depending on your application settings you may then also receive an email confirming the submission. At this stage you can also click to view a summary report, which can be printed or emailed as necessary.
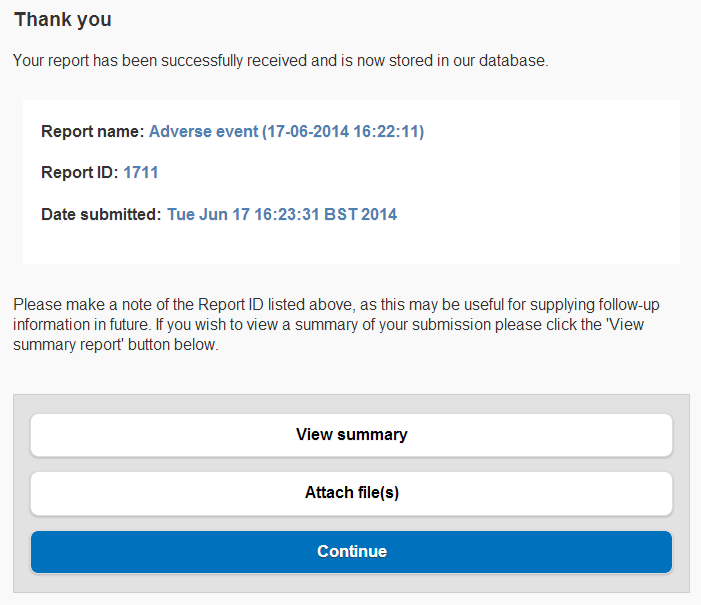
Please note: The summary report is only available immediately after submission, and this cannot be accessed again in future.
For registered users on a private device, any draft reports that you have not submitted yet will be stored on the 'Existing reports' page.
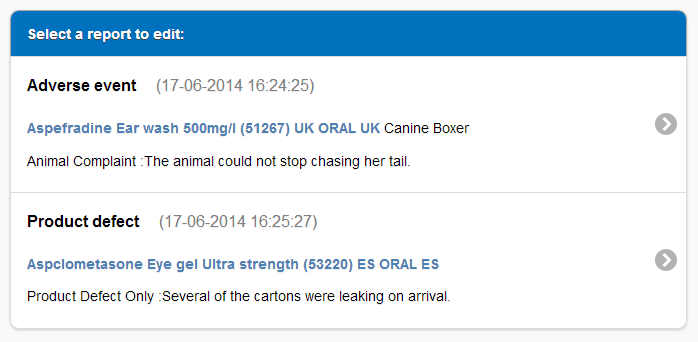
From this screen you can revisit one of these reports by clicking on its link. Once the report screen opens you can carry on editing the report in the usual way.
Please note: it is recommended that the number of unsubmitted reports is kept to a minimum for the purposes of security and data storage limits. Only registered users who are using a private device can store unsubmitted reports.
A 'follow-up' is a special kind of report that allows you to add further information or a document to an existing report that has already been submitted. For example, it may be that further details come to light after the original submission, or perhaps an electronic document is obtained that you wish to add to the case report.
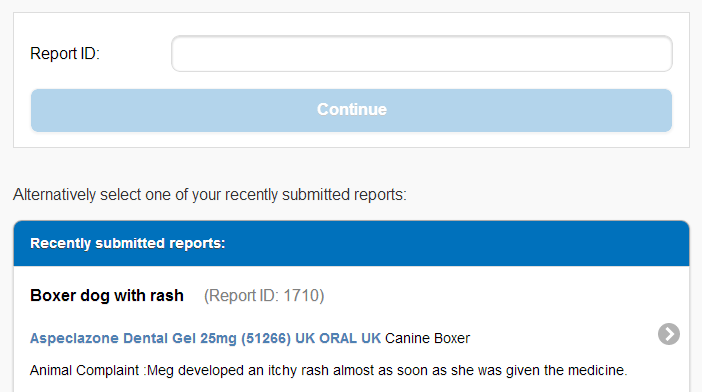
To create a follow-up submission click the 'Submit a follow-up' button on the application Home screen.

You will then be asked to enter the Report ID for the original case. Alternatively there may be some recent submissions stored on your device - in which case, you can click on the relevant report and the ID will automatically be set.
Once the initial case report has been correctly identified you will be asked to provide your user details and any follow-up information that you wish to provide. This can include text as well as file attachments. When your follow-up is complete you can click the 'Submit follow-up' button and the information will be submitted.
An unwanted or harmful occurrence during or after the use of a medicine that may or may not be caused by the medicine.
The evaluation of the likelihood that a medicine was the causative agent of an observed adverse reaction. Causality assessment is usually made according to established algorithms.
A medicinal product administered at or close to the same time as the suspect product(s) but that is considered to have no influence on the clinical condition observed.
The withdrawal of a drug from a patient; the point at which the continuity, reduction or disappearance of adverse effects may be observed.
The ability of a drug to produce the intended effect.
A report containing additional information about a case that has already been reported. This is currently not an option at this point.
The first report that is submitted for a particular case. After this, any additional information can be reported as a 'Follow-up report'.
The company named on the Marketing Authorisation for a specific product in a particular country.
A substance or combination of substances, acting pharmacologically, metabolically, immunologically or chemically and administered with the intention of treating or preventing disease, modifying a physiological or pathological process, or making a medical diagnosis.
Several people may provide information for each case report. One of these should be nominated as the 'Primary reporter' to indicate that they are the main source of information.
Any desktop, laptop, tablet or smartphone that only you have access to. When using PV-Express II on a private device, a number of extra features are available including the ability to save data offline. On a private device, reports do not need to be completed and submitted in the same session. Reports can be started and saved on the device ready to access at a later date, however it is recommended that the number of incomplete reports are kept to a minimum.
The point at which a drug is again given to a patient after its previous withdrawal.
Any desktop, laptop, tablet or smartphone that may be also used by someone other than yourself. If this is the case then another person could potentially access the data you enter into the application, creating a possible security risk. As a result, reports that are created on shared devices cannot be saved onto the device itself. When using PV-Express II on a shared device an Internet connection is required to create and submit reports.
A medicinal product whose administration to the patient is suspected to influence the clinical condition that is observed to some extent.